Why You’ll Love This Recipe
- No Baking Required: Perfect for warm days when you don’t want to heat up the kitchen.
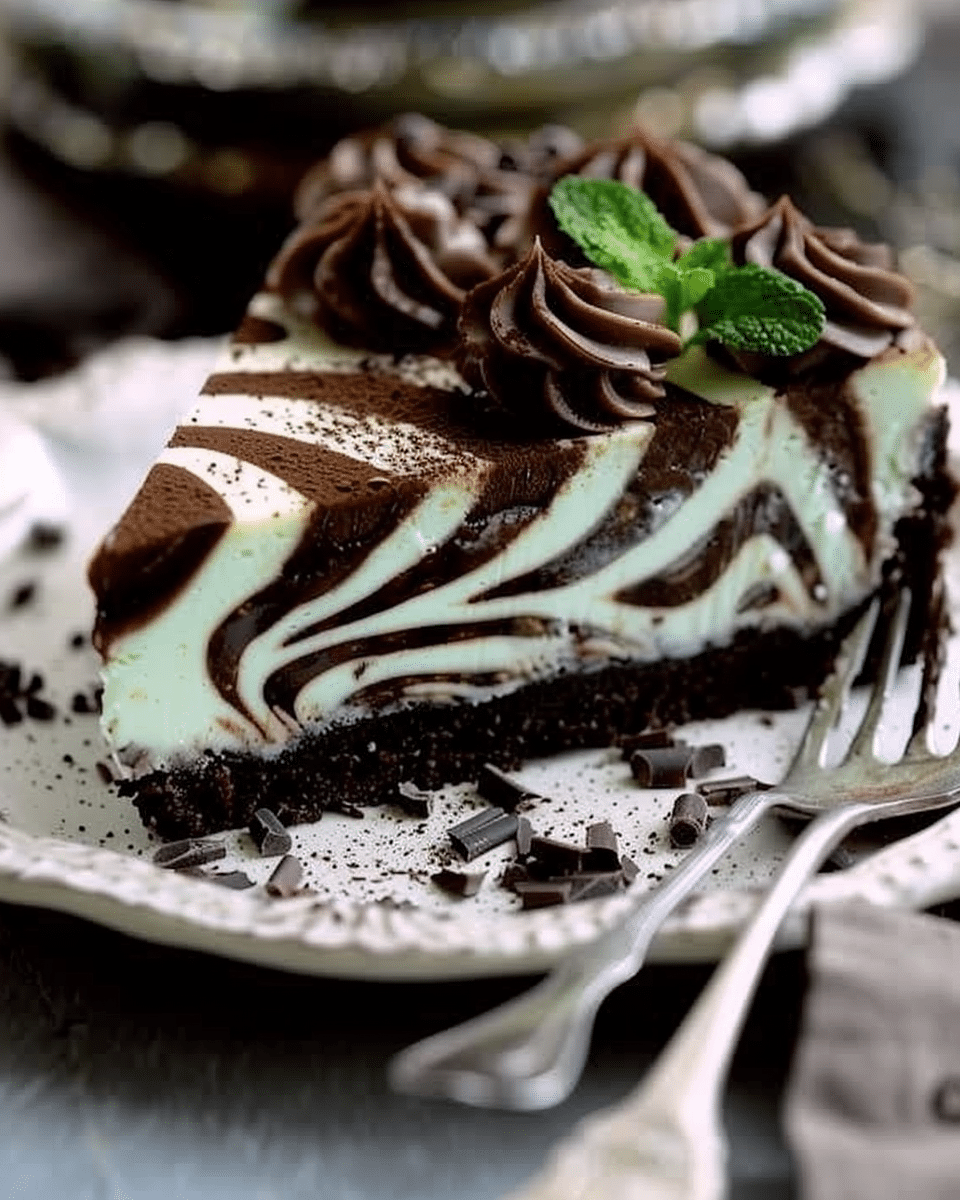
- Beautiful Zebra Design: The alternating chocolate and mint layers create a visually stunning effect.
- Rich & Creamy: Made with cream cheese, heavy cream, and chocolate, this cheesecake is silky smooth.
- Minty Freshness: The cool, refreshing taste of mint pairs perfectly with chocolate.
Ingredients
For the No-Bake Oreo Crust:
- 25 Mint Oreos
- 4 tablespoons unsalted butter, melted
For the Filling:
- 2 packets (2 ½ teaspoons each) unflavored gelatin powder
- 6 tablespoons cold water
- 2 (8-ounce) packages cream cheese, softened
- 2 cups heavy cream
- ½ cup milk
- 1 cup granulated sugar
- ¼ cup dark cocoa powder
- 1-2 teaspoons mint extract
- Green food coloring (optional)
Optional Garnish:
- Stabilized whipped cream
- Andes Mints
- Fresh mint leaves
(Tip: You’ll find the full list of ingredients and measurements in the recipe card below.)
Directions
1. Prepare the No-Bake Oreo Crust
- Finely crush the Mint Oreos using a food processor or by placing them in a sealed bag and crushing them with a rolling pin.
- In a bowl, combine the crushed Oreos with the melted butter and mix until well combined.
- Press the mixture firmly into the bottom of a 9-inch springform pan, ensuring an even layer.
- Place the crust in the refrigerator to chill while preparing the filling.
2. Prepare the Gelatin Mixture
- In a small bowl, sprinkle the gelatin powder over cold water and let it sit for a few minutes to bloom.
- Microwave the mixture for 20-30 seconds until the gelatin is fully dissolved and liquid. Set aside.
3. Make the Cheesecake Base
- In a large mixing bowl, beat the cream cheese, heavy cream, milk, and granulated sugar until smooth and creamy.
- Pour in the dissolved gelatin and mix until well combined.
4. Flavor the Cheesecake Mixture
- Divide the cheesecake mixture evenly into two bowls.
- In one bowl, stir in the dark cocoa powder to create the chocolate layer.
- In the other bowl, add mint extract and a few drops of green food coloring (if using) to create the mint layer.
5. Create the Zebra Pattern
- Remove the crust from the refrigerator.
- Alternately spoon dollops of the chocolate and mint mixtures onto the center of the crust.
- Continue layering, allowing the previous spoonful to spread outward naturally.
- To enhance the zebra effect, gently swirl the top layer with a skewer for a marbled finish.
6. Chill the Cheesecake
- Cover the cheesecake and refrigerate for at least 3 hours, or until fully set.
7. Garnish and Serve
- Before serving, decorate the cheesecake with stabilized whipped cream, Andes Mints, and fresh mint leaves for an elegant touch.
- Slice and enjoy this decadent, creamy cheesecake!
Servings and Timing
- Yield: 12 servings
- Prep Time: 30 minutes
- Chill Time: 3 hours
- Total Time: 3 hours 30 minutes
- Calories: 520 kcal per serving
Variations
- Triple Chocolate Cheesecake
- Add chocolate chips to the chocolate layer for extra richness.
- Swap the dark cocoa powder for melted dark chocolate for a deeper flavor.
- White Chocolate Mint Cheesecake
- Use white chocolate in place of the cocoa powder in the chocolate layer.
- Oreo Cheesecake
- Mix in chopped Oreos into the mint layer for an extra crunchy texture.
- Vegan or Dairy-Free Version
- Replace cream cheese with dairy-free cream cheese.
- Use coconut cream instead of heavy cream.
- Swap gelatin for agar-agar to maintain the structure.
- Extra Peppermint Kick
- Add crushed peppermint candies to the mint layer or sprinkle them on top for a festive holiday twist.
Storage and Freezing
- Refrigeration: Store the cheesecake covered in the refrigerator for up to 5 days.
- Freezing: You can freeze the cheesecake for up to 2 months. Wrap it tightly in plastic wrap and place it in an airtight container. Thaw in the refrigerator before serving.
FAQs
Can I make this cheesecake without gelatin?
Yes! If you prefer a softer cheesecake, you can omit the gelatin, but the texture will be slightly looser. For a firmer set, use agar-agar as a substitute.
How do I prevent my cheesecake from being too soft?
Make sure to chill the cheesecake for at least 3 hours before serving. If your kitchen is warm, an overnight chill is best.
Can I use regular Oreos instead of Mint Oreos?
Yes, you can use regular Oreos if you prefer a classic chocolate crust. If using plain Oreos, you may want to increase the mint extract slightly in the cheesecake filling.
How do I get clean slices when cutting?
For perfect slices:
- Use a sharp knife warmed under hot water.
- Wipe the knife clean between each slice.
Can I make this cheesecake ahead of time?
Absolutely! This cheesecake is perfect for making ahead. Prepare it 1-2 days in advance, keep it refrigerated, and garnish just before serving.
Conclusion
This No-Bake Mint Chocolate Zebra Cheesecake is a must-try dessert that combines the bold flavors of chocolate and mint in a creamy, no-bake treat. With its striking zebra pattern and smooth texture, it’s as impressive to look at as it is to eat. Whether you’re making it for a holiday, birthday, or just because, this cheesecake is guaranteed to be a hit!
No-Bake Mint Chocolate Zebra Cheesecake
This No-Bake Mint Chocolate Zebra Cheesecake is a stunning dessert that’s as delicious as it is beautiful! With layers of rich chocolate and refreshing mint in a creamy cheesecake filling, all on top of a crunchy Mint Oreo crust, this no-bake treat is perfect for any occasion. Plus, the eye-catching zebra pattern makes it a showstopper!
- Prep Time: 30 minutes
- Cook Time: 3 hours
- Total Time: 3 hours 10 minutes
- Yield: Serves 12
- Category: Dessert
- Method: No-Bake
- Cuisine: American
- Diet: Vegetarian
Ingredients
For the No-Bake Oreo Crust:
- 25 Mint Oreos
- 4 tablespoons unsalted butter, melted
For the Filling:
- 2 packets (2 ½ teaspoons each) unflavored gelatin powder
- 6 tablespoons cold water
- 2 (8-ounce) packages cream cheese, softened
- 2 cups heavy cream
- ½ cup milk
- 1 cup granulated sugar
- ¼ cup dark cocoa powder
- 1–2 teaspoons mint extract
- Green food coloring (optional)
Optional Garnish:
- Stabilized whipped cream
- Andes Mints
- Fresh mint leaves
Instructions
Prepare the No-Bake Oreo Crust:
- Finely crush the Mint Oreos using a food processor or by placing them in a sealed bag and crushing them with a rolling pin.
- In a bowl, combine the crushed Oreos with melted butter and mix until well combined.
- Press the mixture firmly into the bottom of a 9-inch springform pan, ensuring an even layer.
- Place the crust in the refrigerator to chill while preparing the filling.
2. Prepare the Gelatin Mixture:
- In a small bowl, sprinkle the gelatin powder over cold water and let it sit for a few minutes to bloom.
- Microwave the mixture for 20-30 seconds until the gelatin is fully dissolved and liquid. Set aside.
3. Make the Cheesecake Base:
- In a large mixing bowl, beat the cream cheese, heavy cream, milk, and granulated sugar until smooth and creamy.
- Pour in the dissolved gelatin and mix until well combined.
4. Flavor the Cheesecake Mixture:
- Divide the cheesecake mixture evenly into two bowls.
- In one bowl, stir in dark cocoa powder to create the chocolate layer.
- In the other bowl, add mint extract and a few drops of green food coloring (if using) to create the mint layer.
5. Create the Zebra Pattern:
- Remove the crust from the refrigerator.
- Alternately spoon dollops of the chocolate and mint mixtures onto the center of the crust.
- Continue layering, allowing the previous spoonful to spread outward naturally.
- To enhance the zebra effect, gently swirl the top layer with a skewer for a marbled finish.
6. Chill the Cheesecake:
- Cover the cheesecake and refrigerate for at least 3 hours, or until fully set.
7. Garnish and Serve:
- Before serving, decorate the cheesecake with stabilized whipped cream, Andes Mints, and fresh mint leaves for an elegant touch.
- Slice and enjoy this decadent, creamy cheesecake!
Notes
- If you prefer a firmer cheesecake, allow it to chill overnight.
- For a stronger mint flavor, increase the mint extract slightly.
- Use agar-agar instead of gelatin for a vegetarian alternative.


