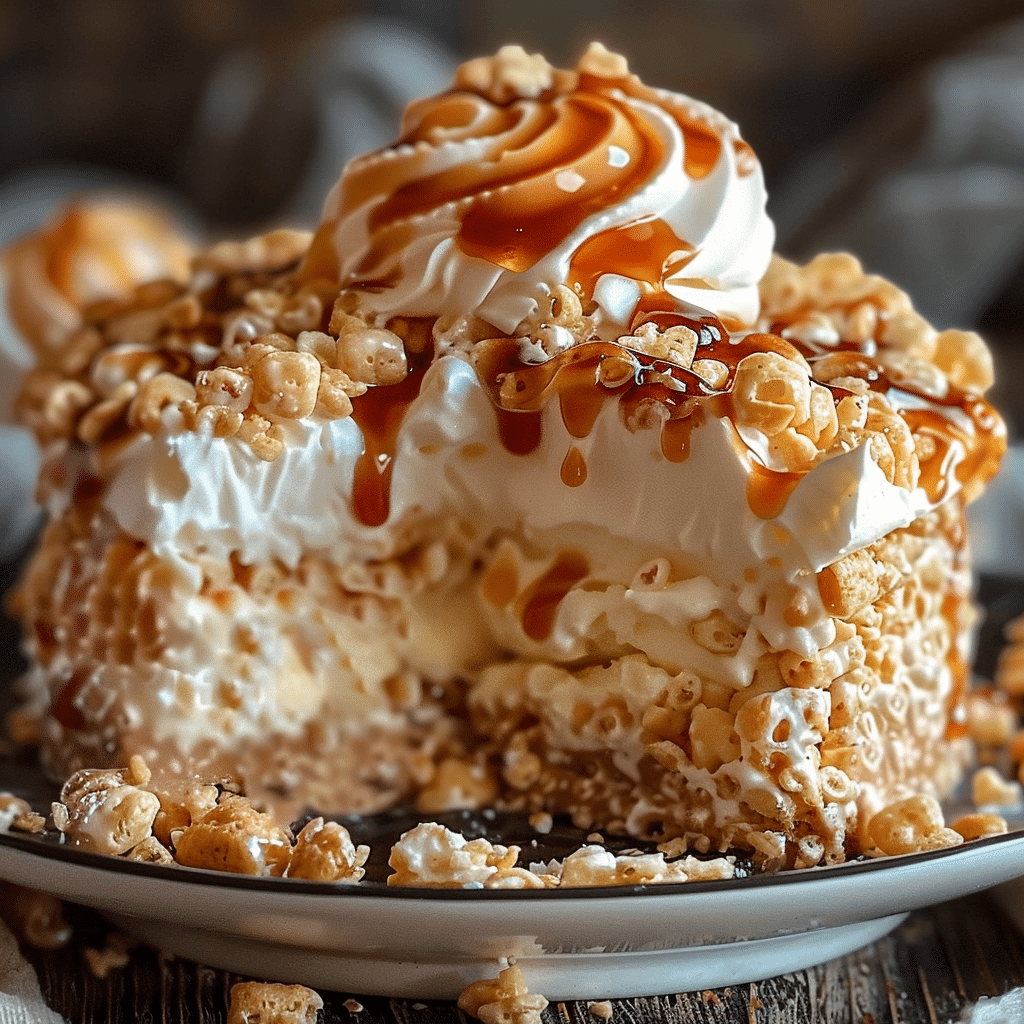
Why You’ll Love This Recipe
- No-Bake Convenience: Enjoy a delicious cheesecake without the need for baking, making it perfect for warm days or when short on time.
- Texture Harmony: The crispy Rice Krispie crust pairs wonderfully with the smooth and creamy cheesecake filling.
- Nostalgic Flavors: Combines beloved childhood treats into a sophisticated dessert suitable for all ages.
Ingredients
For the Rice Krispie Crust:
- 4 cups Rice Krispies cereal
- 4 tablespoons unsalted butter
- 10 ounces mini marshmallows
For the Cheesecake Filling:
- 8 ounces cream cheese, softened
- ½ cup granulated sugar
- 1 teaspoon vanilla extract
- 1 cup heavy cream
- ¼ cup powdered sugar
- ½ cup marshmallow fluff
Optional Garnish:
- ½ cup mini marshmallows
(Tip: You’ll find the full list of ingredients and measurements in the recipe card below.)
Directions
- Prepare the Rice Krispie Crust:
- In a large saucepan, melt the unsalted butter over low heat.
- Add the mini marshmallows and stir until completely melted and smooth.
- Remove from heat and gently fold in the Rice Krispies cereal until evenly coated.
- Press the mixture firmly into the bottom of a greased 9-inch springform pan to form an even crust. Set aside to cool.
- Prepare the Cheesecake Filling:
- In a mixing bowl, beat the softened cream cheese, granulated sugar, and vanilla extract until smooth and creamy.
- In a separate bowl, whip the heavy cream and powdered sugar until stiff peaks form.
- Gently fold the whipped cream into the cream cheese mixture until fully combined.
- Fold in the marshmallow fluff until evenly incorporated.
- Assemble the Cheesecake:
- Pour the cheesecake filling over the prepared Rice Krispie crust, smoothing the top with a spatula.
- Optional: Sprinkle mini marshmallows over the top for added texture and decoration.
- Refrigerate the cheesecake for at least 4 hours, or preferably overnight, to allow it to set properly.
- Serve:
- Once fully set, carefully remove the cheesecake from the springform pan.
- Slice and serve chilled.
Servings and Timing
- Yield: 8-10 servings
- Prep Time: 20 minutes
- Chill Time: 4 hours (or overnight)
- Total Time: 4 hours 20 minutes
Variations
- Chocolate Twist:
- Add ½ cup of melted chocolate to the cheesecake filling for a chocolate-infused version.
- Peanut Butter Delight:
- Incorporate ½ cup of creamy peanut butter into the melted marshmallow mixture for the crust to add a nutty flavor.
- Fruit Infusion:
- Fold in fresh berries or fruit preserves into the cheesecake filling for a fruity contrast.
- Oreo Crunch:
- Mix crushed Oreo cookies into the Rice Krispie crust for an added layer of flavor and texture.
- Caramel Drizzle:
- Drizzle caramel sauce over the top of the cheesecake before serving for extra indulgence.
Storage/Reheating
- Storage:
- Store any leftover cheesecake in an airtight container in the refrigerator for up to 3-4 days.
- Freezing:
- To freeze, wrap the cheesecake tightly in plastic wrap and aluminum foil, then place in a freezer-safe container. Freeze for up to 1 month. Thaw in the refrigerator before serving.
FAQs
Can I use store-bought Rice Krispie treats for the crust?
While homemade provides better control over texture and freshness, you can use store-bought treats in a pinch by pressing them into the pan to form a crust.
Is it necessary to use a springform pan?
A springform pan is recommended for easy removal and presentation, but you can use a regular 9-inch pan lined with parchment paper for easier lifting.
Can I make this cheesecake ahead of time?
Yes, this cheesecake can be made a day in advance and stored in the refrigerator until ready to serve.
What can I substitute for marshmallow fluff?
If marshmallow fluff is unavailable, you can melt additional mini marshmallows with a bit of corn syrup as a substitute.
How do I prevent the crust from becoming too hard?
Ensure you don’t press the Rice Krispie mixture too firmly into the pan, and avoid overpacking, which can lead to a hard crust.
Can I add toppings to the cheesecake?
Absolutely! Consider adding chocolate shavings, caramel drizzle, or fresh fruit on top for added flavor and decoration.
Is this recipe gluten-free?
Rice Krispies cereal contains malt flavoring, which is not gluten-free. To make
Rice Krispie Treat Cheesecake
This Rice Krispie Treat Cheesecake is the ultimate no-bake dessert, combining the nostalgic crunch of Rice Krispie treats with the creamy decadence of cheesecake. With a marshmallow-infused crispy crust and a light, fluffy cheesecake filling, this fun and indulgent treat is perfect for birthdays, parties, or any special occasion!
- Prep Time: 20 minutes
- Cook Time: 4 hours (or overnight)
- Total Time: 4 hours (or overnight)
- Yield: 8-10 servings
- Category: Dessert
- Method: Baking
- Cuisine: American
- Diet: Vegetarian
Ingredients
For the Rice Krispie Crust:
- 4 cups Rice Krispies cereal (use gluten-free if needed)
- 4 tablespoons unsalted butter
- 10 ounces mini marshmallows
For the Cheesecake Filling:
- 8 ounces cream cheese, softened
- ½ cup granulated sugar
- 1 teaspoon vanilla extract
- 1 cup heavy cream
- ¼ cup powdered sugar
- ½ cup marshmallow fluff
Optional Garnish:
- ½ cup mini marshmallows (for decoration)
- *Chocolate shavings, caramel drizzle, or fresh berries (optional toppings)
Instructions
Prepare the Rice Krispie Crust:
- In a large saucepan, melt butter over low heat.
- Add mini marshmallows, stirring continuously until smooth and melted.
- Remove from heat and gently fold in Rice Krispies cereal until evenly coated.
- Press the mixture firmly into the bottom of a greased 9-inch springform pan, creating an even crust.
- Set aside to cool while preparing the filling.
2. Make the Cheesecake Filling:
- In a large mixing bowl, beat cream cheese, granulated sugar, and vanilla extract until smooth.
- In a separate bowl, whip heavy cream and powdered sugar until stiff peaks form.
- Gently fold the whipped cream into the cream cheese mixture until fully combined.
- Add marshmallow fluff and continue folding until evenly incorporated.
3. Assemble the Cheesecake:
- Pour the cheesecake filling over the cooled Rice Krispie crust, smoothing the top with a spatula.
- Sprinkle mini marshmallows on top if desired.
- Refrigerate for at least 4 hours (or overnight) to allow the cheesecake to set.
4. Serve & Enjoy:
- Carefully remove the cheesecake from the springform pan.
- Slice and serve chilled.
- Optional: Drizzle with caramel or chocolate sauce before serving.
Notes
- For a softer crust, don’t press the Rice Krispie mixture too firmly into the pan.
- If you can’t find marshmallow fluff, melt additional mini marshmallows with 1 teaspoon of corn syrup as a substitute.
- Allow the cheesecake to fully chill for the best texture.


